Links
Tags
Shadow IT powered by Power Apps
It's been a few months since posting having been struck with the spicy flu and several other coughs and colds. But given the surge in celebration of Power Apps, I think it's time for an 'Old Man Yells At Cloud' rant.
Over the last 12 months or so, when I log into LinkedIn - I can be assured that every other week someone else is celebrating a certification in Power Apps or want to showcase how they built an awesome COVID-19 contact tracing portal / timesheet solution / seat booking tool / leave application form or any other simple to moderately-complex form - all thanks to the wonderful Low / No Code product known as Microsoft Power Apps. As a software developer who began his commercial career converting Bob's spreadsheets to C#, Jane's Microsoft Access databases to ASP.Net Web Forms and Joanne's Frontpage sites to <insert your favourite CMS here>, this really has me baffled.
Power Apps presents itself as "Macros and VBA" projects in the cloud. After all, it's attempting to solve the same problem that Excel and Access have served well for decades by creating exactly the same problem - enabling several "Shadow IT" departments to form within your organisation by empowering power users with the ability to rapidly write their own custom solutions to solve "complex business problems". During the 90's and 00's where rapid application development was a priority and software development practices for internal business solutions were still maturing, this might well have been an acceptable compromise. But as those who have been instrumental in converting those little golden nuggets of business continuity would know, having Jenny from accounting writing her own expense tracker or James from Asset writing their own inventory tracker opens you up to all sorts of data governance issues, clones of functionality producing differing results, impossible-to-solve help desk tickets and in some extreme cases - invalid answers from erroneous formulae. So then, if we have developed many best-practices for software development, building governance frameworks to prevent the sprawl of bad coding standards, having a much larger focus on building secure software workflows, why are various IT management-type roles convinced enough to encourage the business to pump out several 10s of magnitudes greater single-purpose and crazy UI experiences in this new world?
To understand how it's happening, you need only look at Microsoft's marketing for Power Apps. It's spot-on for convincing management types through promises low or no code solutions - all in the cloud with no infrastructure to worry about - so you can get on with your job of looking after... well, not quite sure what if you've just moved everything "to the cloud". You'll create visually beautiful* applications in substantially less time than it'd take to spin up a custom software development project (this is true!). You can use a bunch of pre-defined controls and templates to quickly produce applications that integrate with various connectors - usually SharePoint Lists, Dynamics 365 and / or SQL - but there's a couple of hundred premium connectors that probably do 50% of what you need it to do with any sense of performance. You'll be able to take advantage of the security provided in those platforms and get all your power users on board and best of all - you need not worry about it, it's all managed - right?. Whack a login page on your app and you're set. Sounds absolutely fantastic - no need to run complex development environments, pay for compute and data storage infrastructure and solve all problems as if it was an entire IDE designed for large complex enterprise applications.
What isn't mentioned until you start delving through licensing is that unlike your typical pay-per-developer seat or application license, you're paying per consumer. $5 USD per app to be specific (or $20 USD if you want your consumers to access any number of apps from your library). To be clear - each form you create, each dashboard you present - they're encouraged to be a single "App" that will appear on your Power Apps list. At $60-$240 USD per year, you'd want to hope the large majority of your user base is taking advantage of that large library of apps you're building.
And what about those promises? If low to no code is what you're after, then you'd hope that much of desired functionality is out of the box. To be clear, there's three ways of building apps and perhaps the most popular way is to use Canvas. As you go about your business of dragging and dropping the typical controls you'd expect to find in an IDE, you might come across a situation where you have some tricky show / hide business based on inputs from other fields. You can use natural language to help you out, you can write custom code to do it. Either way, you're encouraged to write spaghetti when a typical development language might allow you to use variables and other "SOLID" principals to achieve the same far more elegantly than those years of horrible SSRS hacks (remember those?). And let's say you've created one formatting function that you'd like to reuse in 10 of your other apps? Well, you can do that if you create a custom function component as described here and include them within centralised libraries - yet it all seems strangely over the top and requires your power users to be familiar with these concepts without being developers themselves. I'd nearly expect too that due to the lack of intuition in encouraging new users to compartmentalise their software and relying largely on business power users to build apps, that your Component Libraries section will be empty (or certainly close to it!).
And there in-lies one of my critical problems with encouraging power users to build "applications" - who is Power Apps for? If it's for Stewart from Legal to track his clients, Stewart is very unlikely to realise that things like central libraries exist - so he'll go on to make some pretty horrible (by software development standards) apps that will become crucial to his own workflow, because he is not a developer nor should he be expected to understand the intricacies the rest of us learn by dedicated work. If he leaves, who picks it up and runs with his app? It doesn't follow any standards, probably has zero documentation (have you tried putting comments in a Power App?) and might well fall subject to "it's too hard, it'll be quicker for me to rebuild it". If it's your own IT team? Why would you want to add the burden of managing several small business applications in this manner over carefully planning and designing these processes as part of your larger CRM / ERP? Why would you want to run a project that has little to no documentation, very simple source control (if you're lucky!) and individually tailoring custom functionality for each of your users?
There's obviously a lot of assumptions about the kind of users you might have in your organisation above and there's definitely use cases I can see where it might work - especially small businesses to suggest these little forms might well be affordable and useful to solve minor problems. In large enterprise, it can help offset development tasks for those side activities and short-lived projects. There are several MVPs who showcase and empower users to look at the things they can create, so there's certainly a thriving user base to solve problems with - albeit usually simple imitations of commercial SaaS or COTS products. Need a Kanban board? Go and get yourself a community Azure DevOps, or sign up to Trello. Need a Help Desk solution with solid workflows? You'll typically pay per Agent for Zendesk and come in at under $100 USD per user per year. COVID-19 contact tracing forms? Sure there was definitely a use case in the early days yet there are several Github projects later and vendors selling or providing free SaaS solutions for that too - and you wonder whether that investment was genuinely worth it (in Power Apps, not the end result).
From a UX perspective, this is another area that requires years of experience to get right. It's fair to say a large majority of users wouldn't pick these up as concerns, but putting a designer hat on - my OCD goes off at nearly every Power App I see. Power Users by and large do not understand the reasons grid frameworks in web design have been the bread and butter of responsive design for some years. While the IDEs attempt to anchor controls in some sort of uniformity, it's also too easy to ignore what all those snaps and anchors do creating very offset controls, stupidly large textboxes on a 4k screen, inconsistent typography, inconsistent whitespace, lists that perform woefully without data virtualisation or pagination, and that dreaded Comic Sans use pops it's head up from time to time unironically. The list goes on... it's just too easy to produce these cardinal sins of the responsive web world.
Then there's perhaps the most important topic of this decade - security of your data. Specifically when using SharePoint Lists - because nearly every example uses it. It's not a new problem to see tickets about being able to see other user's data because the original author of the SharePoint List was unaware of the security controls within SharePoint Lists, but when your business users are empowered through those 'community of practice' type material and build data sensitive applications - they can't possibly be thinking about security in a Power Apps flow if they've never been taught anything about security in the first place. After all, they're using a Microsoft product so it must be secure by default? Yes, we put a login page through the Azure SSO connector - but that SharePoint List we use did not factor in the various user accounts that we tweaked along the way that meant literally everyone in the organisation can see sensitive information. In one extreme example, an 'app' configured a record to be openly available for Read / Write activities as part of an Automate workflow because the author was unaware of secure ways to achieve it otherwise. It makes sense as to how the author got there - hack about, make it work and publish. It wasn't until entire lists of personal data were visible before it became an issue.
Despite all the promise of empowering business users, corporations with ISVs willing to consult for large exorbitant fees - at the end of the day, it's your own IT Support team that will start fielding new types of queries about how custom unknown code isn't doing the thing that can't be explained very well. So you go and train your own team to learn about this new platform just so you know a little bit more than the author of the problem. We can all sit around and celebrate how none of us really know what's going on and that we can kind of make it work - all without bothering your software development team.
So why does it drive me insane? At some point, there are going to be hundreds of applications with dubious user bases and data criticality. At first, things will seem easy - until there's customisation required. Some of those applications will go on to contain interesting and useful business value data. Other users will start to manipulate that data and rely on it for their own particular business problems. In a world where strong data governance is at the forefront of most IT strategies, Power Apps seems like one of the biggest antipatterns to emerge from a company all about promoting data governance as a critical component of managing your Azure deployments. And before you say - "well, didn't Access and Excel do the same thing? At least it's all in the cloud now and not on some laptop HDD" - yes, you're absolutely right. But we also spent literal decades trying to discourage that sort of ad-hoc development. But here we are, chucking out Excel and Access, and encouraging power users to double down on building more complicated things using more complicated processes without training using whatever spaghetti they can cook up.
And - I guess that's why I can see my future of Continuous Employment by rebuilding (or suggesting how to rebuild) parts of these as fully-fledged and proper SDLC delivered projects in my future.
Knobs, Wiring and Buttons - Progressing on the A320 FCU
I haven't had a lot of time the last few weeks to work on the FCU much further, however there are a couple of updates worth sharing.
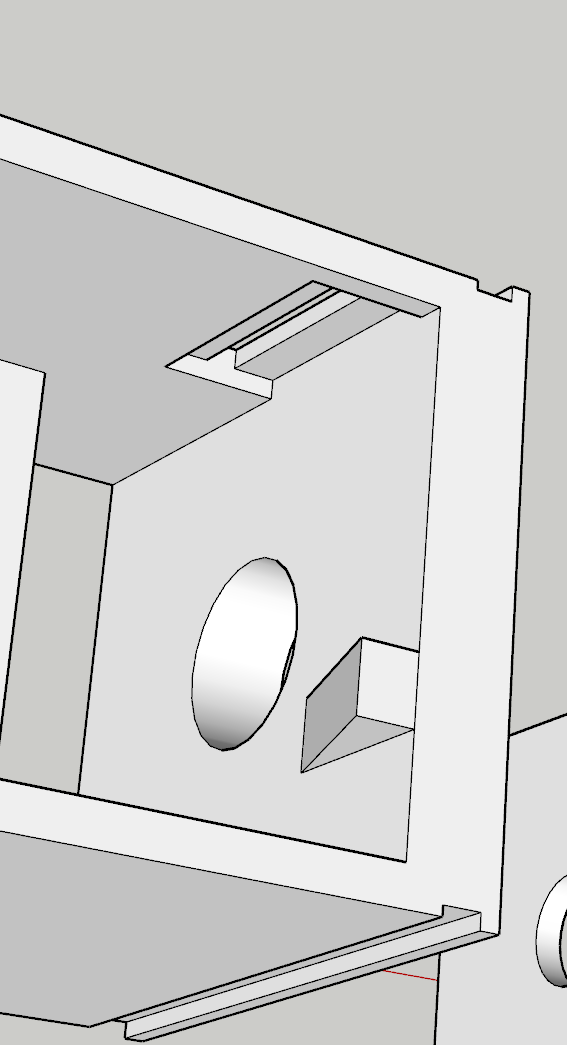
Minor redesign to the back plate
I had this grand idea to make insertable Korry's into place and have them as removable independent units. Unfortunately, those LED lights wouldn't fit inside the chamber I had printed and the outcome wasn't great. To get around the need to glue and design all of those components, I had completed another design - this time where the chamber was integrated to the backplate. As I wasn't too sure about the tolerances here, I had printed a few different sizes to work with the Korry inserts but I really only had one shot at getting the backplate done.
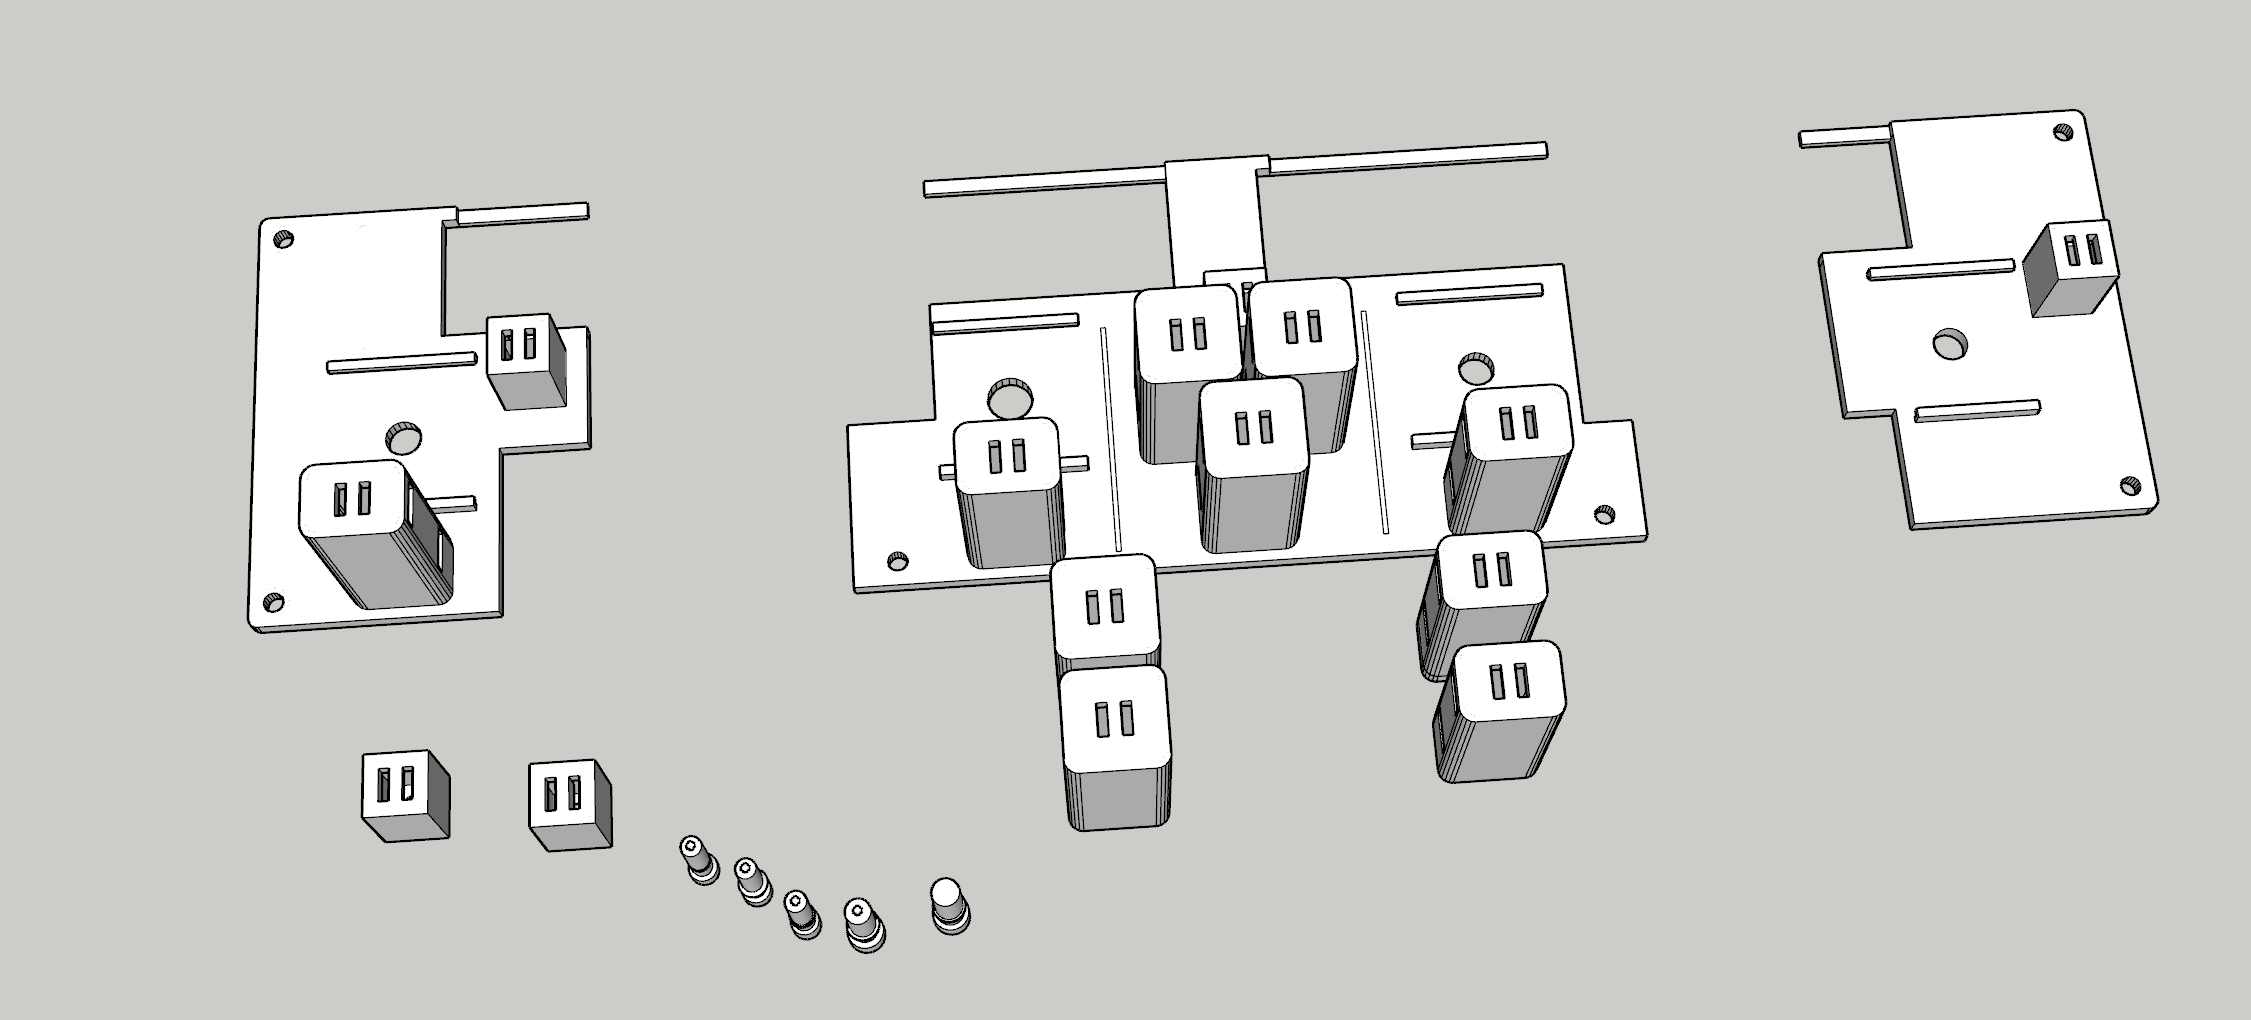
With this out of the way, the next step was to insert buttons and led lights into each of these new chambers. Again, this took several goes that I had pre-empted and thus the creation of different sizes - but thankfully things like leaving a large gap to slip the buttons in really helped out here. It was fiddly though, and you really get to know just how tight (i.e. < 0.1mm inaccuracies) things may fit or require a bit of filing and cutting to get things in snug.
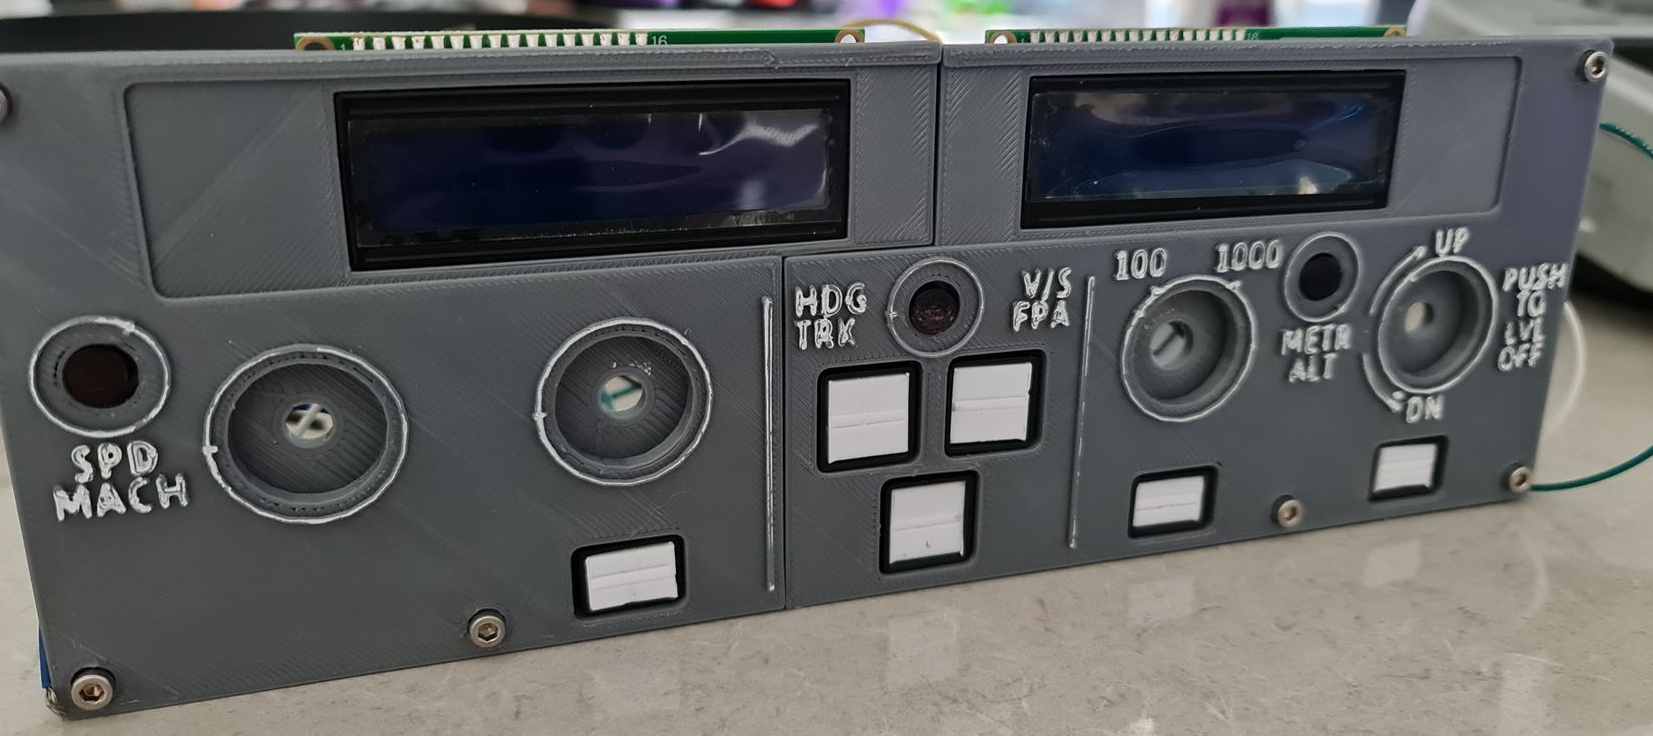
With the screens in place, it's starting to come along.
Installing the Rotary Encoders
I've spent a bit of time going back and forth on getting a good, repeatable push-pull rotary encoder working and in the middle of doing this had learned a few more quirks about the printer - especially printing such small volume items. For the Rotary Encoders in particular, when I began I was printing shells, stalks and knobs altogether with the same material. As I started printing smaller volumes, I started getting stringy mess and prints that wouldn't be loose enough around the rotary encoder itself.
Having not had to level this printer for a few months, I figured at the very least I'd clean up the bed, re-level it manually and give the internals a good clean too (ensure the filament isn't slipping in the extruder from a build-up of gunk). I'd 3D Print a calibration cube and everything was within known tolerances (< 0.1mm on the Z axis but otherwise everything else recorded a perfect 2mm). I had printed a few other things at the same time and they also come out well without stringing. It finally dawned on me that perhaps the part was 'too hot' and wasn't given enough time to 'cool down' before applying the next layer. So to remedy the next print, instead of printing one stalk - I printed all the working parts and things kind of went back to normal.
The reality is that when you start playing with your printer - you start having to 'learn' all the quirks again. Having a more level bed and now knowing about volume of prints to help dissipate heat means you're back to calibrating your software settings to compensate too. So it's fair to say that it took quite a few goes before usable prints were coming out.
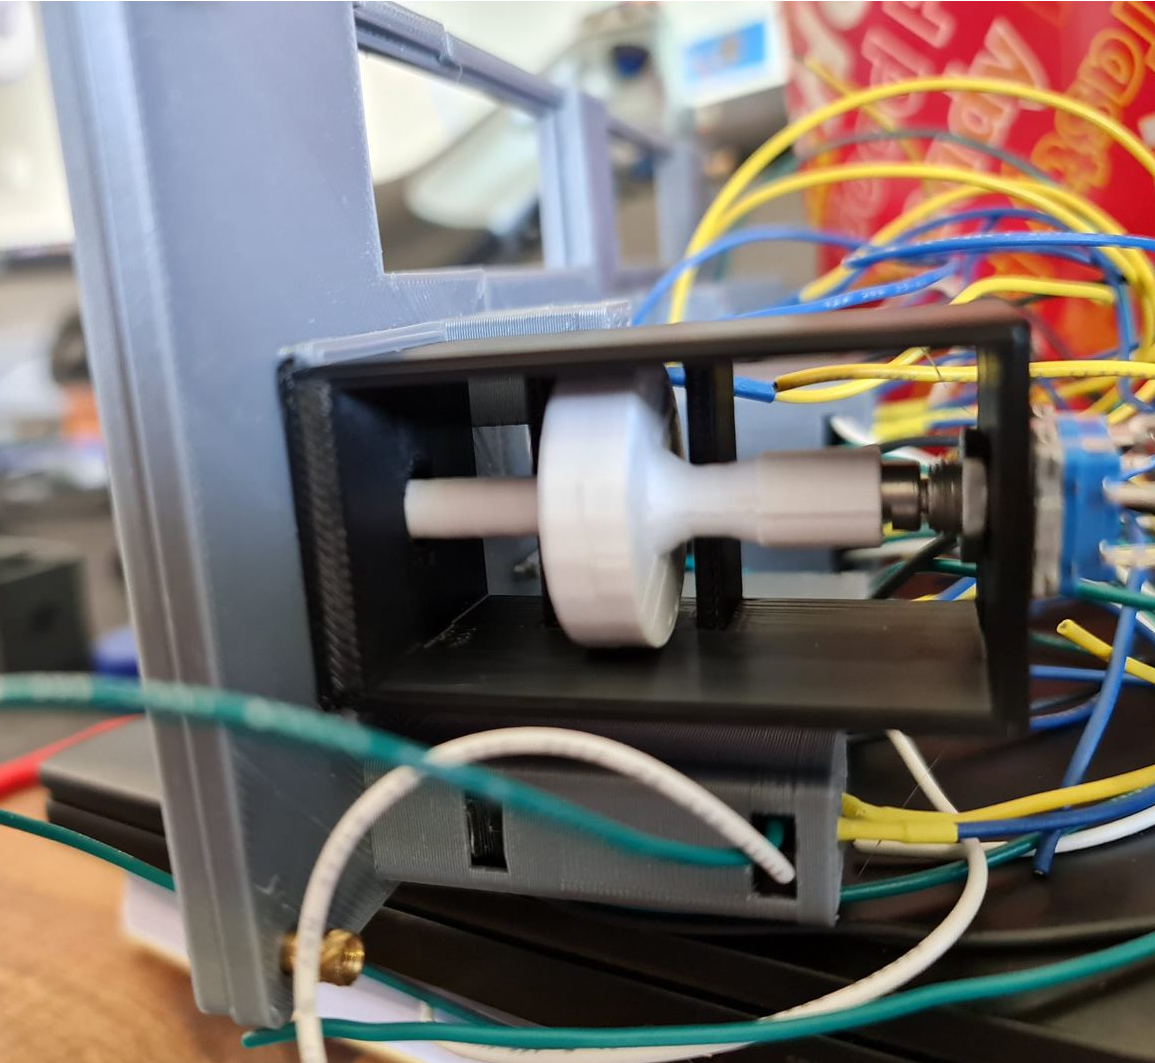
With the first prototype in place things are looking on the up. This particular switch has the right clearance off the button at the back and works perfectly. I perhaps had unrealistic expectations that the same will occur for the other ones - but unfortunately it didn't quite work that way. For the second rotary encoder, the disc didn't quite go all the way down on the rotary encoder so the disc itself in the 'release' mode was touching right up against the pull mechanism - not a great outcome. It's fair to say that in hindsight, I would probably use a longer stalk button to remove that margin of error and perhaps had a bit more of a gap and maybe a spring to help. In any case, something to improve on.
Things get a bit more challenging for the altitude selector. There's an outer ring that selects either increments of 100 or 1,000 - this would need to sit around the stalk and be some kind of a compression fit to hold the selection. I don't expect this mechanism to last long - and perhaps a second encoder or toggle switch might have helped (there are plenty of options on Thingiverse). Behind the scenes would be a microswitch that by using very little friction at all, can sit on the microswitch when activated.
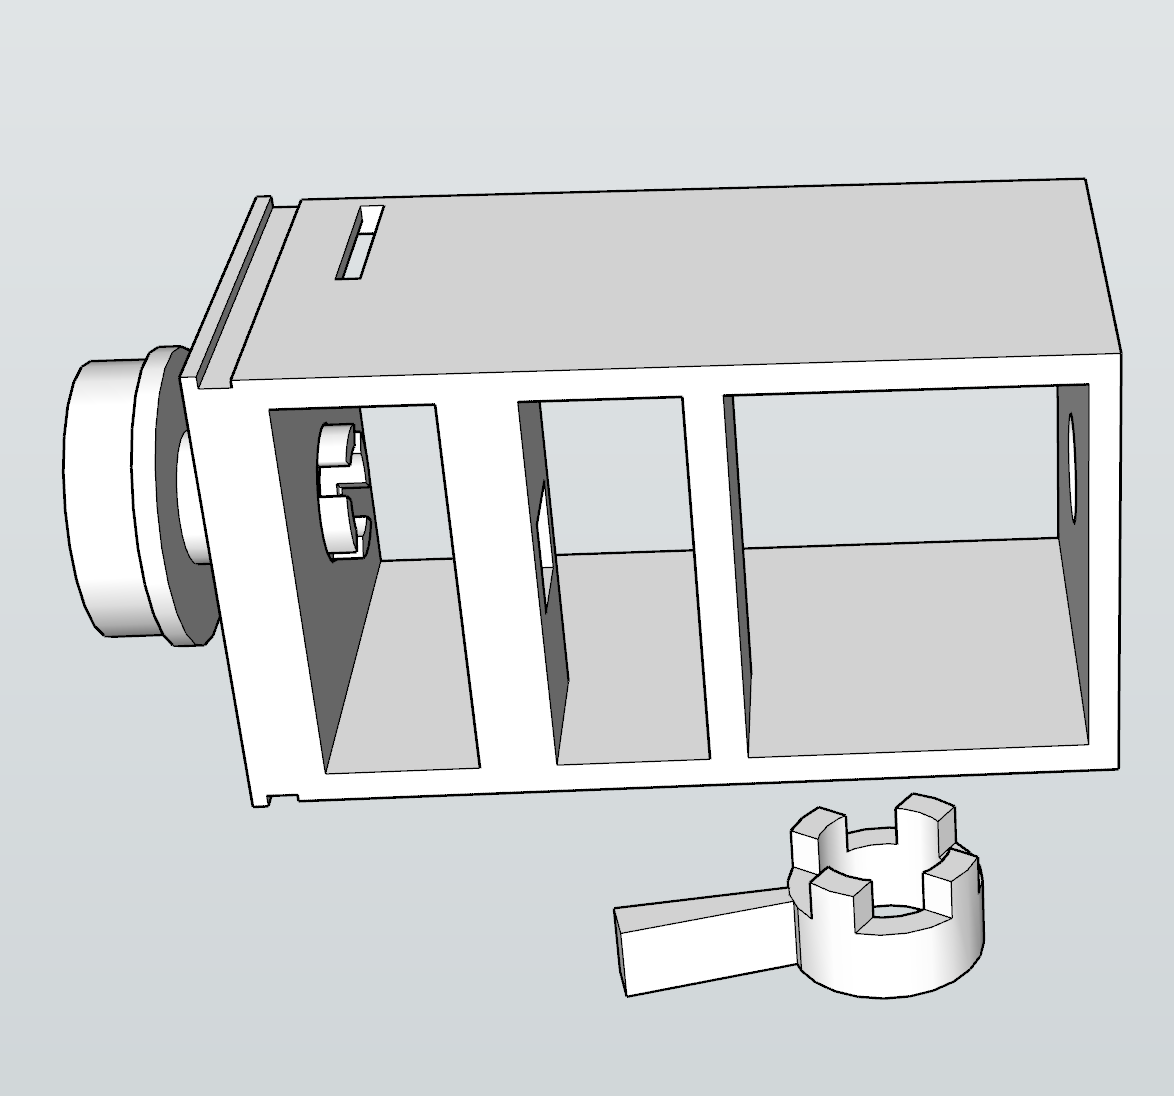
With the selector and activator connected together, and the microswitch installed - we should be able to select 100 or 1,000 with some creative license by rotating the ring. The final piece of the puzzle was working out how far the grip should protrude. Apart from having to print this a few times, this was perhaps the easiest part to assemble and now the knob and selector fit reasonably well.
What's next?
I'm at the final stages now of the assembly itself leaving behind some fiddly and trivial components.
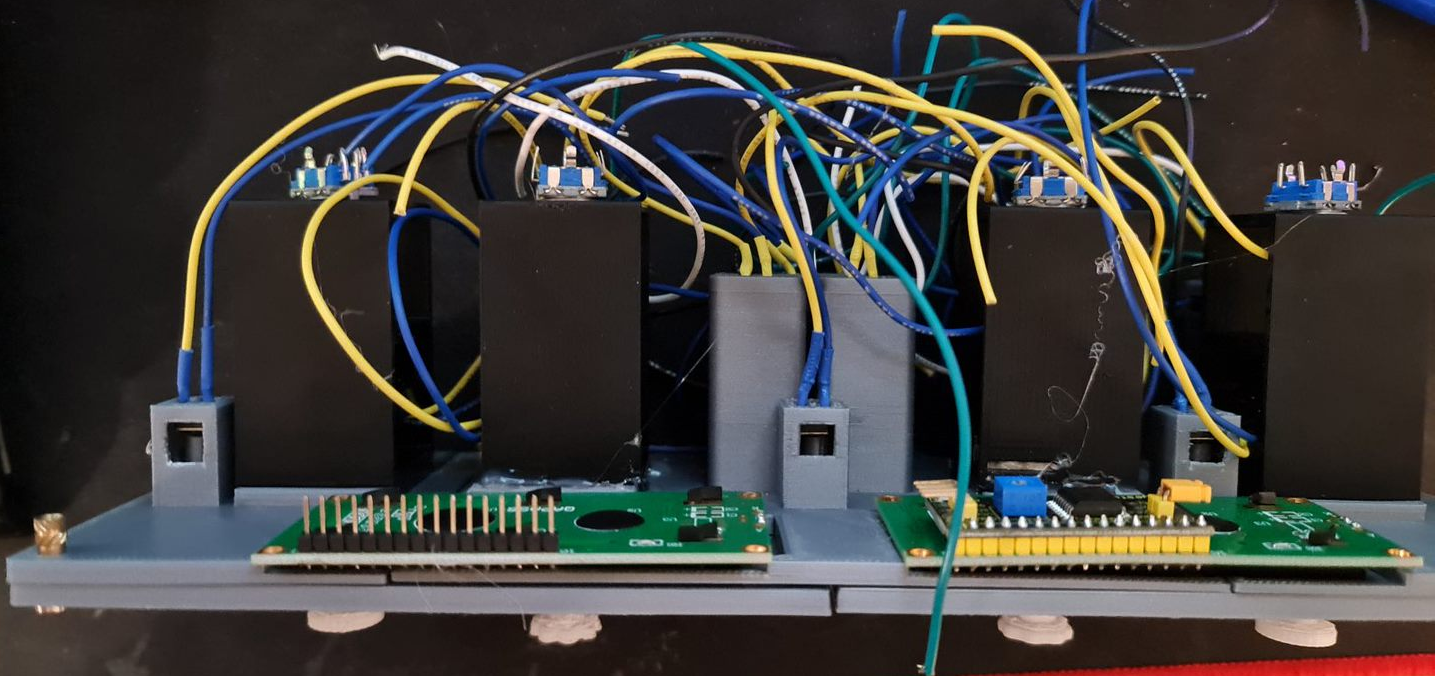
- An Arduino Mega 2560 needs to be wired up. I've got some proto boards ready to solder all the wires to.
- A shell for the components to sit in. This is currently printing whilst typing.
- Printing some Korry labels - this will likely be a transparency on a white sheet of paper.
- Get this all running and working in Flight Simulator, via SimConnect.
- Final decorations - black shroud for the LCD screens for example.

It's fair to say that should this be a repeatable design, I think I would embrace sacrificing imitation for simplicity. For example, the Korry 'pull' action might very well be replaced with additional push buttons on the face. That would then leave the rotary encoders available for a very simple installation. The same applies for the 100/1,000 selector - that might well be a toggle button or a switch. The Korry switches themselves could be made significantly smaller with a larger button - possibly a Cherry MX style key switch. The 1602 LED screens might well stay, although a future version I want to wire up using custom 7-segment displays and LED status lights. None-the-less, it's been a great learning project and hopefully we're only one or two posts away from testing a flight from Melbourne to Sydney.