Links
Tags
An Arcade Machine of Sorts
About a month ago, I posted about testing out a P5 Panel I'd acquired during an end of financial year sale from one of my go-to suppliers. This weekend, I've had a chance now to do something a little more permanent with those panels by building an arcade machine. As my son becomes a little more interactive with things, it'll be a fun way to program a few little games for him to muck about with.
The first step for this build was to pull out my trusty old version of Sketchup 2017 and draw out a basic frame. Inside of this, some 60mm illuminated buttons from Amazon, 2 x P5 Panels and 2 x 165mm marine speakers will need to fit into the chassis. I made sure to also include the width of the MDF when measuring out the box to ensure we're not the 40mm short for the speakers to comfortably sit.
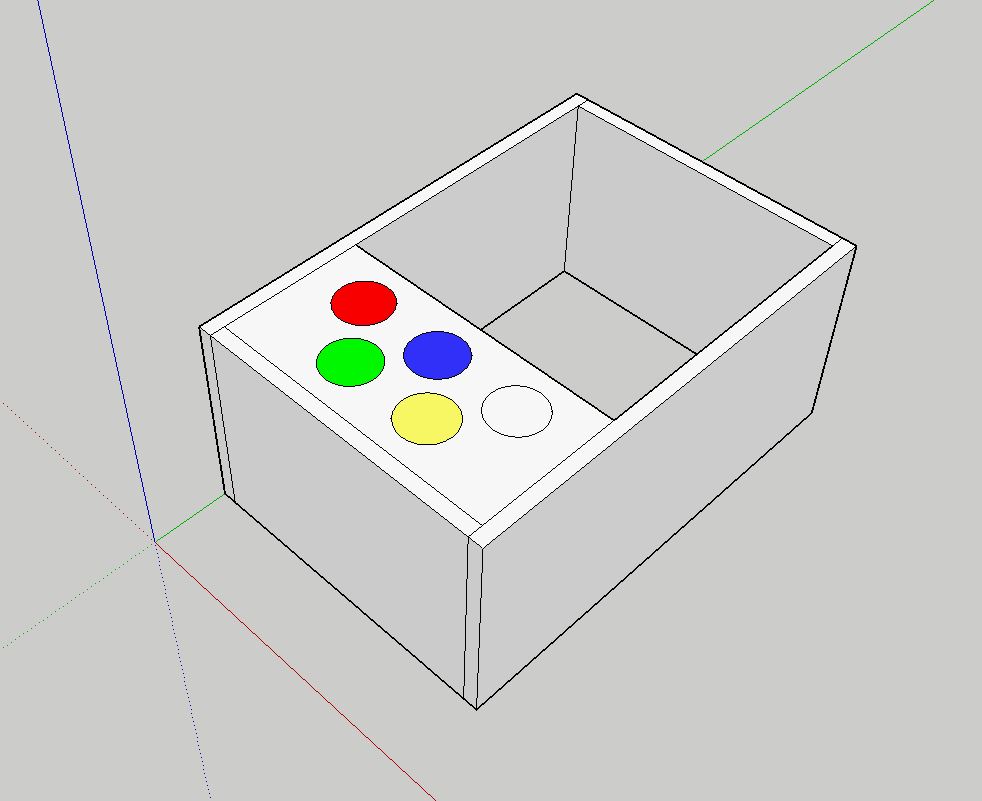
I've opted to go straight lines with this, we can use a routing bit or T-moulding to clean this up later - but otherwise straight lines are going to be infinitely easier to work with here, and will support some vertical mounting later. With each of these panels determined, it was time to go to Bunnings to find some suitable MDF. In this case, it won't be exposed to weather so the ease of working with MDF over Plywood was the deciding factor here, but you could quite easily go the Plywood route if you wanted something a little more solid. I got some 1200mm x 600mm x 16mm MDF (as T-moulding usually comes in 16mm), some red spray paint and got to work cutting the panels out.
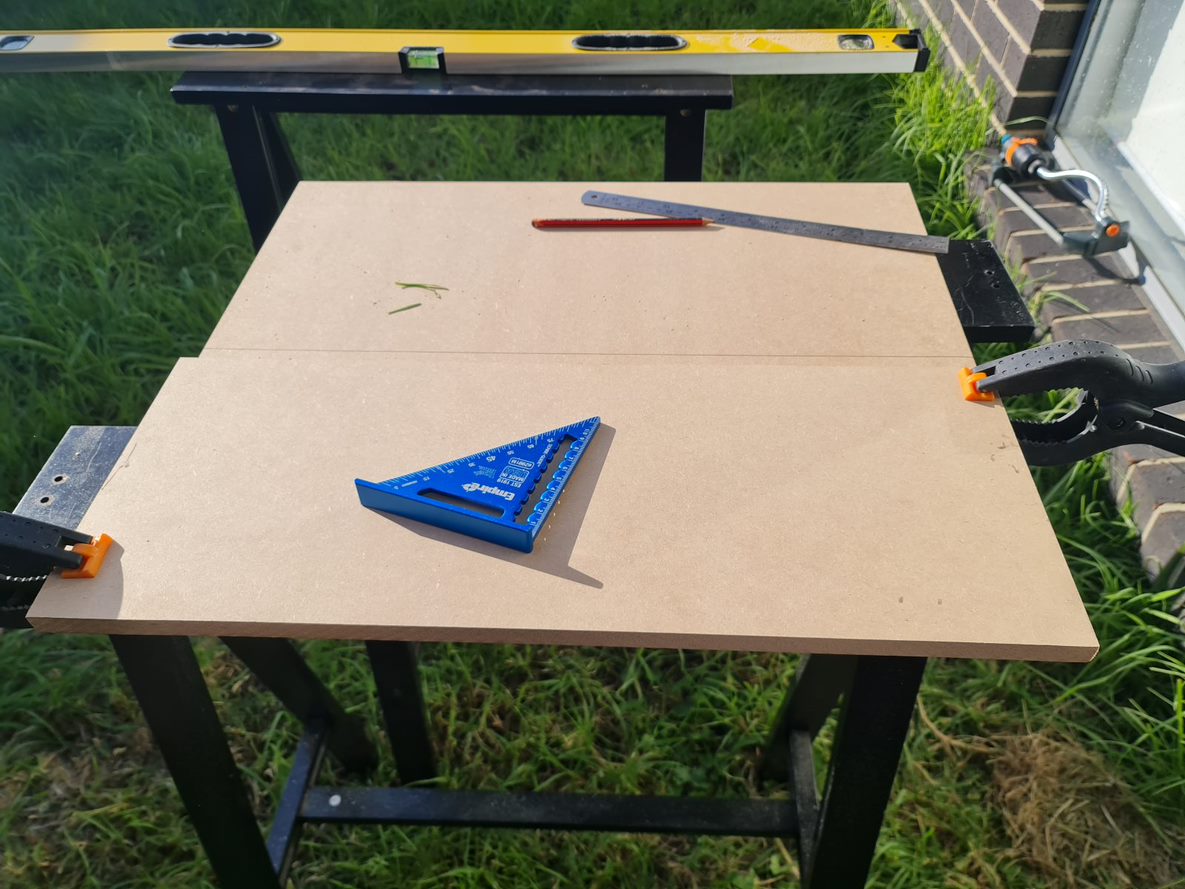
Yeah, that lawn really needs mowing - but given how wet it's been around here, it's been near impossible to find a good enough day that won't involve mud flinging from one side to the other. That aside, once it was all cut out and sanded back to the right size, some drilling + wood screws got the box assembled pretty easily. I used a hole saw bit with the drill to get the holes in for the arcade button - taking care to drill the pilot hole first, and cutting about 50% of the way in first before finishing from the other side. The advantage of doing this is you won't end up with any chipped wood as a result of the final bit being cut off (lesson learned from a previous arcade project!). All assembled to ensure things fit, it was time to get the wood filler to patch any holes before painting.

With the components all fitting nicely, it was time to print some joiners for the screens so that they line up as good as possible, while giving me something to screw into the chassis. Thankfully, someone had already designed some joiners so I didn't have to go out of my way to design them myself. With those on the printer, I had to make a door for the back and add some hinges. With that out of the way, it was time to paint. Now, I suck at painting - I can never get the right amount of spray paint on this. I was doing well until the final coat - but overall it's a nice colour - given my son's favourite colour right now is "James".
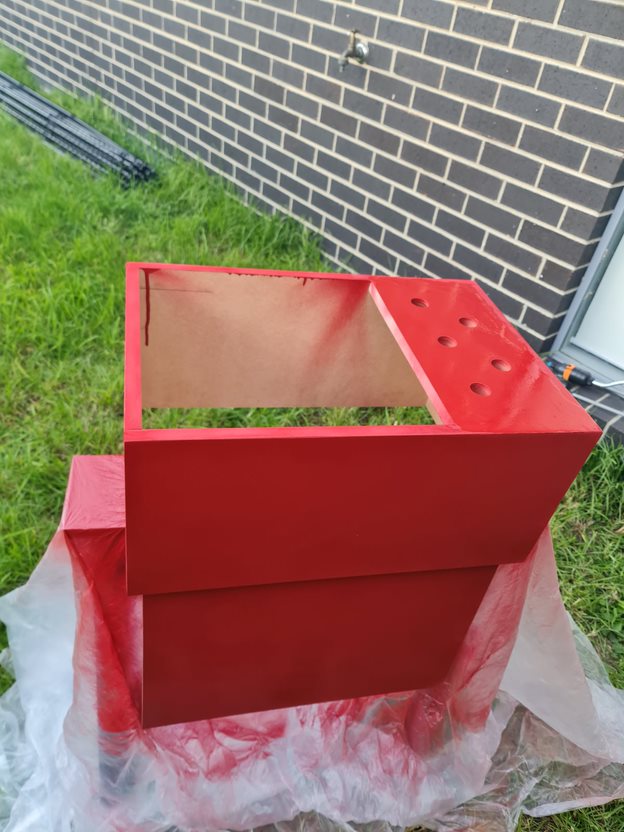
After a few coats of paint and an overnight dry, it was time to cut the holes for the speakers out by drawing a circle around 135mm diameter. Now, I don't have a protractor but I did have a ruler with a hole and a screw - so I was able to fashion something out of a ruler, marker and screw to draw a circle. With a large drill bit and a jig saw, the hole was in place and ready for installation.
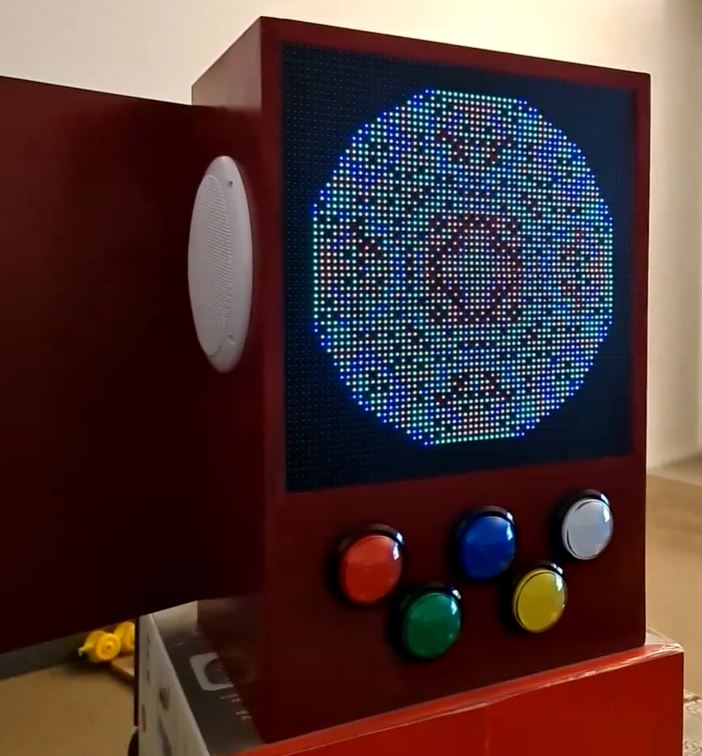
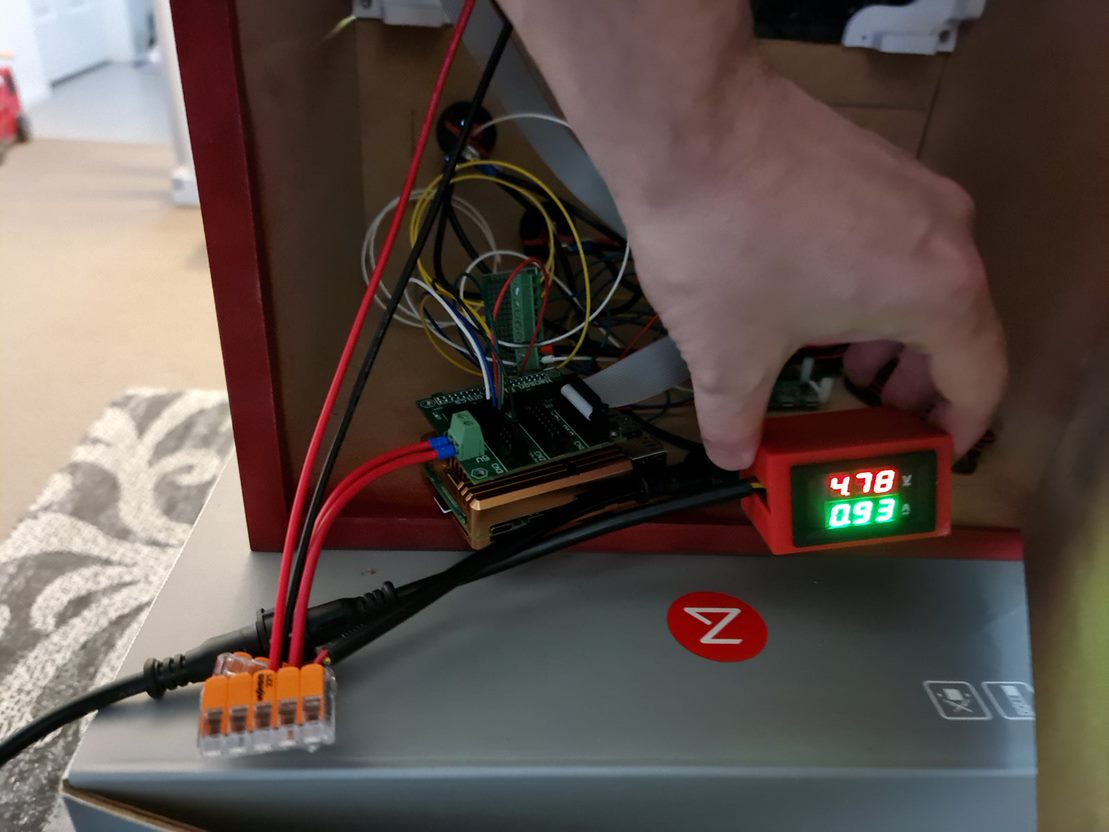
Ok! This is starting to look pretty cool, still need to wire up the buttons and speakers. To do the speakers, I'd ordered a super cheap 50W amplifier board from Amazon while waiting for some slightly better ones to come along. This would allow for the marine speakers to have enough 5V juice to make some noise. Despite some crackling, the speakers are pretty good for some cheapies from DJ City. They'll do for some outdoor speakers mounted inside some resin rocks I'm planning for later in the year! I won't link the amplifier here, but any TPA3116D2 based amplifier will work here. With that wired in, I had a few USB sound cards in use here for a Raspberry Pi Zero. As the P5 Panels need the hardware pulse that is normally reserved for audio (otherwise you get lots of flickering), it's not a problem to use whatever USB sound card you might have lying around. I guess you could use HDMI audio if you can get the right converter.
For the button wiring, I had been using the rPi-P10 controller from Hanson electronics. You can of course wire this in manually if only using one chain, but this board does include some level shifters (3.3V to 5V) that will come in handy shortly. Unfortunately, the use of the level shifters means we can't detect any button presses. After jumping on the soldering iron, I'd pulled out a small PCB, several terminal connectors, used a tall-header GPIO Pin Header (to allow hat stacking), and wired on some Dupont connectors for lighting up the LEDs for the buttons individually. In hindsight, I might have replaced the buttons with some WS2811 LEDs to control the colour as well, maybe a future project than the LEDs with resistor values for 5V.
The rPi-P10 board is wired using this diagram - so reverse engineering it, I had determined I'll use the slots reserved for the second chain for the LED lights, and the third chain for buttons. I had confirmed the pinout works per the document before cutting away at pins. In the end, I had chopped 5 legs off the stacking connector so that they wouldn't pass through to the rPi-P10 hat for the buttons, and using Dupont connectors found the right R0/G0/B0/R1/B1 pins within the second connector so I could take advantage of the 5V level shifter on this board. You could simply use a level shifter and build your own board, but this crude board does the job for now. In the coming month, I'm going to give KiCad a go for this board and check out a process using JLCPCB or PCBWay to produce and send them through. It's so cheap these days to get custom PCBs, but it would have helped here to not have jump wires all over the board.
The final step was to wire it up, write some test code to ensure the buttons all work and to have some songs and pictures show up. Impressively, this set up under normal usage sits around 1A at 5V, so this whole thing is powered for several 10s of hours from a Romoss 30,000mAh battery. I had a Raspberry Pi 4 in at the time to do some debugging with (much faster to compile), but even that kept all lights lit and the matrix running at around that 1A mark (65% brightness). Obviously, the more white on the screen and loudness of the speakers all play a part, but impressive none-the-less.
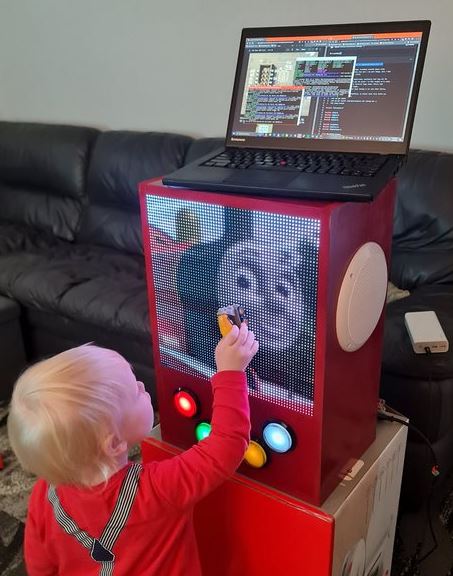
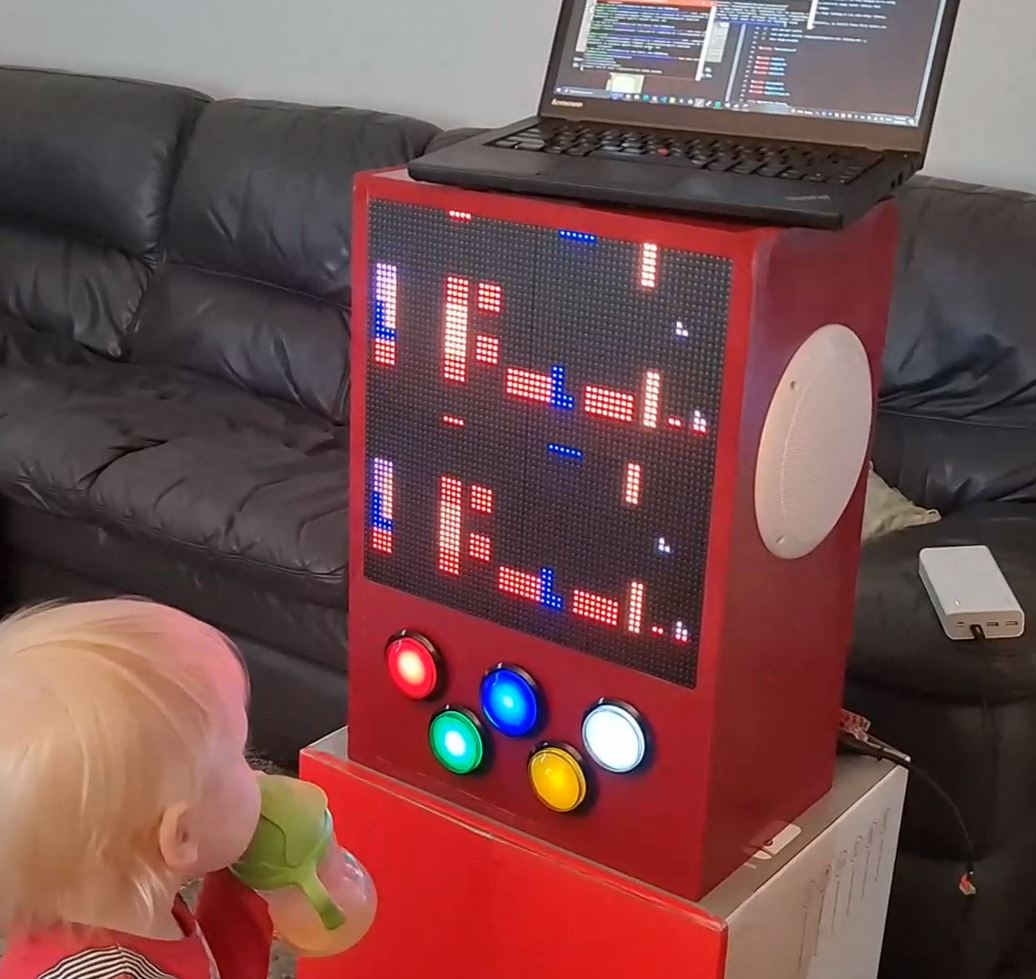
Suffice to say as I sit here on a lazy Sunday afternoon, it looks pretty awesome and kiddo loves it too. Hopefully it'll give my phone five minutes of peace while we can code some things for it such as some low-res PICO-8 games that make use of the buttons.
Should I Take the Leap to Convert My Monolith to Microservice?
Ever since microservices and serverless architecture patterns became the desired end-state for many, there hasn't been a lot of love for the old monolith architecture in mainstream posts - so much so that both patterns really helped coin the term "Monolith" as the bad thing to do. Perhaps it's just not fancy to post on LinkedIn that you built a successful monolith application. But - if you're going to throw out the monolith with the bath water, you probably want to know what it is you're giving up and what you're getting yourself into.
Having spent the last five years writing code within microservices and serverless stacks, I remember clearly my own early views considered "serverless" and "microservices" as the way of the future given how easy and convenient containers were to run at the time. The problem with these architectures as your default stance is that they are ridiculously overcomplicated for simple things. By all means, the advantage list is certainly an impressive one:
- Deploy components independently - the smaller the service, the easier it is to deploy independently. It gets even better if you're using functions instead of containers with the ability to pick and choose your language runtime. Start-up times are significantly reduced, placement of services is flexible and if blue-green / zero downtime is your goal, this can be a super desirable feature.
- Smaller services = smaller teams - small codebases can be understood in their entirety by individual developers. The larger a codebase is, the harder it is to maintain that level of expertise.
- Use the right tools for the job - Need to spin up some ML in Python? Coupled with a complex schema in .NET via Entity Framework? Need a few lines of scripting via NodeJS? Yes - you too can produce a multi-lingual and dependency focussed service for your task.
There are many others when it comes to testing, speed and fault isolation, but I think it's fair to say these are usually the top three reasons to break that large monolith down into scalable components. The trouble is, given how down-spoken monoliths are for their larger codebases, planned and coordinated release schedules and the many dependencies you may need to carry out through a release - you might not look too deeply into some of the pain and horror stories you might live by trying to build out a genuine microservices application.
That old ecommerce example as a monolith
Let's for a moment consider you arbitrarily have 40 microservices. How big is your team? If smaller code bases = smaller teams, that might well imply you have 40 teams of 2-3 developers / testers / system engineers (or 120 staff for one application). But then you might also consider 'if these services are micro by nature, perhaps 1-2 developers can comprehend several services?' - the burden of managing several codebases without the time-saving advantages of tightly coupling components together, that's context-overload in the making. And for what? If your goal was to reduce deployment complexity - you're sorely mistaken. Compiling one codebase is much easier to deploy in it's entirety than manually deploying 40 codebases. Sure you can pull out Kubernetes to manage a containerised workload but you'll find yourself with as many configuration files as you have services for. If your team is not scalable then you're going to find yourself quickly heading down the worst of all microservice architectures - the Distributed Monolith. This one should be feared by everyone - all the disadvantages of deploying and managing distributed systems, with all the disadvantages of coordinated and procedural deployments for single-process applications. I guess you can, in theory, keep those cheeky SQL joins in place to allow you to traverse cross-domain...
Ok - enough with the slabs of text. Everyone loves a good e-commerce schema. It's something we all intrinsically know, it's been done to death in every demo because we all do shopping. As such, you don't need to have built an ecommerce website to know the typical elements.
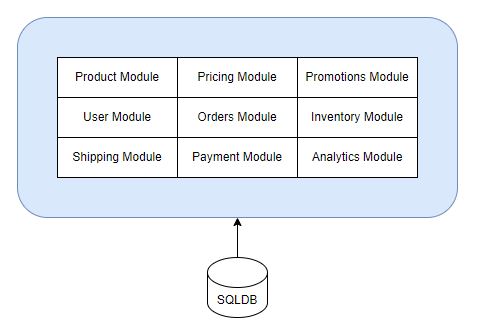
Inside of this example, you might expect somewhere in your solution some code to recalculate all fields within your Cart. That code might live within User Module, Orders Module or a Cart Module if you choose to separate them out. It might look something like this:-
foreach(var item in basket) {
    // check the product is in the database (Product Module)
    // check we have an updated price in the database (Pricing Module)
    // check that the item has enough stock (Inventory Module)
    // collect an 'add' activity event (Analytics Module)
    // get weight for product (for Shipping Module)
    // check if the item participates in any promotion for price discounts
}

// check if there are any cart-level promotions (e.g. spend $100 get free shipping kind of things, or perhaps you're a VIP customer)
// calculate shipping if we have a valid postcode
// deduct any 'holds' from current inventory stock level
// update your basket

return basket;
This sort of thing is fairly involved. If you've got some crafty SQL experts on hand, you could imagine several queries taking advantage of the humble RDBMS structure you might have in place to get performance to an acceptable level. It's fair to say that even if it was a lengthy procedure of a lot of code, this will be infinitely easier to debug and track down what's going on in your Basket than if you had each of those modules acting as it's own independent service.
For starters, we can take advantage of a non-isolated single process to manage all of these activities. If there's only one RDBMS, we can meet ACID transaction compliance by using the databases' built in transaction handling capabilities. That is, either all data is committed or none of it is committed. Perhaps another way to look at it is that everything is successful, or nothing is successful. We don't have to think about managing the partial failure scenario.
Even when it comes to managing availability of your website, if you're geographically located in one primary region, then you can purchase virtual machines up to 6TB in size with 448 virtual CPU's if you want to vertically scale that high so it's fair to say you can size your website to take a considerable traffic hit with a few button clicks if your website was a Monolith. Even if you're only running on one system, there are ways to cheat Autoscaling groups into ensuring at least one copy of your virtual machine is available by setting your Minimum, Maximum and Desired targets to 1.
There are quite obviously limits in simply scaling vertically. There's also nothing stopping you creating shared-memory instances and scaling your monolith horizontally (remember, this problem has also been solved for years and baked into frameworks such as ASP.Net State Management). The point is, Monoliths are not restricted by growth - they just aren't as granular as their serverless and microservice counterparts which help achieve that speed metric that is often the killer for very fast response times to scaling.
So when should I consider a microservices architecture?
I like to think of successful microservices architectures closely resembling an organisation's business units and the functions within. In the ecommerce example above, it might be quite feasible to have a team responsible for product sourcing, a team for pricing, a team for inventory, a team for customer management and the list goes on. There might be sub-functions those teams perform. If you can model your software around those well-defined domains, then it's fair to say that it's unlikely you'll see any significant change in your data contracts. You can change how you do things, but the outputs are still the same.
Take for example a Product. Give it a name and a description, these things are unlikely to ever change. How you source them might. How you organise them might. As long as that data contract is solid, then the complications of modifying a schema are lessened. Removing something from a contract is infinitely harder to coordinate. In a microservices architecture, you are the one solely responsible for publishing your contracts for other services to consume - so removing things, changing things will impact other teams. There are several strategies for handling different versions, but it can lock you in - unless you start down the Distributed Monolith path of coordinating several releases together (and even the best microservice disciplined applications will no doubt hit this hurdle at some point during the lifecycle).
With distributed services come new problems, especially in the ACID compliance space. While there are techniques available (two-phase commit for example), the drawbacks can be quite considerable and impactful if not handled or worked around correctly. There are several strategies that attempt to avoid ACID altogether, such as Event Sourcing and transaction handling using the Saga pattern. The fact that there are several ways to do it, all with their own level of verbosity make it quite a considerable investment - so you're going to want to get this one right.
Ignoring the complexity of storing events for the moment, let's consider an example where you might want to control stock reservation for a limited period of time. Perhaps you have a limited batch of products available, and rather than have lots of disappointed carts you want to - as people add something to their basket, they add to a reservation. In a monolith, this might be a sequential set of steps with simple two-table queries and updates to an availability column in an inventory table. In an ACID transaction, this is trivial as discussed above.
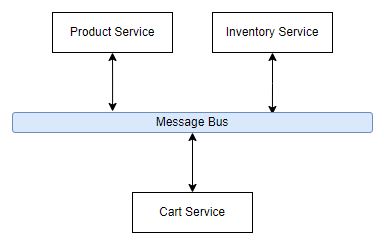
In a microservices architecture, we can build some interesting things.
- Cart Service asks "tell me about Product 123". Product service could send a message "Product 123 is a pair of shoes" and Inventory Service could say "We have 3 x 123's in stock". That sounds great in theory, but now you need to capture message responses in your code. Instead of it being a couple of queries, we need to send messages out and wait for messages to come back in. How will you do that? Saga may have the answer and if implemented correctly can produce some pretty technically amazing things. Implemented incorrectly, and you may have an invalid state - what if Inventory dies? Perhaps Inventory is overcome by message requests - perhaps a DDoS of sorts. If we have several processes waiting for Inventory to respond, do we then take out every other service, even though they were supposed to be logically isolated? While we are at it, something needs to orchestrate these calls so that you can collect responses and do things - so by removing several dependencies, we create a new one on an orchestrator. Is the orchestrator equipped to scale properly?
- Cart Service asks the Product Service specifically for details and waits for the response. Perhaps it times out after some time (how long?). Then it asks the Inventory Service for a stock reservation. It's nice to be able to do this with messaging, but how do you handle a situation where there might be several 'Inventory services' doing this? How does only one pick up the message? You can configure queues to help do exactly once (very slow) or aim for at least once (allow duplications and out of sequence messages) but you need to cater for these scenarios.
Interestingly, we don't see the same issues in a Monolith. We never need to be concerned about whether one or the other is down - because in most circumstances the situation cannot exist. Databases don't go down in the same way.
Building an architecture this way also requires all dependencies to scale that way too. This can be a mammoth effort to pull off yourself. The major cloud providers do this with their global reach and economies of scale and resell this back to you. But this might also limit your technology choices which means giving up the convenient lifestyle that SQL and N-Tier applications have comforted us with. It's not all bad of course, for the example above - would anything particularly go wrong if the Product Service queries never executed? It's a safe-guard for sure, but it might not be necessary.
We can't discount Serverless here either - functions (e.g. Lambda) remove an individual scalability problem for code execution, serverless database platforms do the same for storage. Naturally, none of these products are magic - they still run on servers somewhere, but the orchestration complexity is taken out of the equation - and that can make it easy to deploy simple things into the cloud.
Consider reading a file from an S3 bucket in AWS versus reading a file from a local file system. In a self-hosted scenario, this might be as simple as File.ReadAllText() and surround the call in some try / catches. In a Serverless function, there is a lot to configure.
- IAM policy for your compute resource to access the Bucket (or update your Bucket Access Policies)
- Your code needs to check for things along the way and log them into a central log store somewhere.
- You need to import S3 dependencies, and execute the correct chain of commands to download the object, unwrap it and read the content before doing things with it.
On one hand, you'll never have a scalability problem and you would be super unlucky if your file disappeared or corrupted in any particular way. On the other... it's a lot of extra conditions you need to think about (availability of the service, what's the failure scenario if it fails). You even have access to things like Step Functions to help manage your workflows for success / fail scenarios. So serverless can be quite helpful, but when you start venturing into the business logic domain, that's where different styles of technologies will start to present some significant challenges with many ways to go wrong / produce spaghetti / produce something that is not monitored / traceable / will burn down someone's house (ok, maybe not that last one).
The bottom line is deploying 'code' might be easy, but building the right solution with many possible avenues for failure and enforcement of security is difficult. If you don't know your business domain very well, it'll be even more difficult. If you don't have the staff to take on different programming languages and specific resources that you might need to manage and you're heading into impossible.
So, what's the recommendation then?
Every problem you face will always have a number of outcomes associated with it. This post is more about highlighting the opposite side of the fence - the one that doesn't get spoken about a lot. The unpopular opinion as it were. The whole point of spending time writing software is to produce an outcome. I'd suggest that if your application requirements can comfortably fit within an EC2 instance and be manageable for the lifetime your application is expected to live for, and your team is relatively small then don't discount the option that's tried and tested just because everyone else is doing microservices or serverless.
On the other hand, if you are planning for scale or you're planning on only paying for what you use and go down the serverless path for your trials, don't have a team to look after infrastructure? Then it's time to go ahead and build your serverless application. There's a lot of things you can do to ramp up without it costing very much. If you have the luxury of finding technical talent (perhaps that's yourself) to manage your own NoSQL queries, using any of the 'Simple' AWS services to build out your architecture - that might very well achieve some high availability goals without employing teams of people to manage operating systems.
If you've got the human-power to write microservices and can really take advantage of that independent scaling whilst handling your domain model to avoid it becoming a distributed monolith, then you're probably well on your way to the nirvana promised by microservices.
The answer as always is... it depends. Just don't discount a pattern because it's no longer the cool thing to do.